JMBricklayer 70008 Rainbow Unicorn Review
Hey brick fans! We are back with JMBricklayer's latest building block
set, it's Fantastic Idea themed
Rainbow Unicorn set 70008. This set is unique because I haven't seen Lego or any other
building block manufacturer come up with a set that is so elaborate, especially
since it is enhanced by colourful lighting effects. In today's review,
I'll share with you what I liked and what improvements could be made to make
this set even better.
In the world of building blocks, JMBricklayer has been making waves with
creative and vibrant designs. Their latest release is a captivating rainbow
unicorn building set, perfect for fans of fantasy and construction. Whether
you're into mythical creatures or just love a unique challenge, this unicorn
set offers a magical experience. Thanks to JMBricklayer for
providing the set for this review!
If you're not familiar with JMBricklayer, all of their building block sets
come boxed when shipped and as a result would make the perfect gift for that
special person who is a fan of Lego compatible sets. And JMBricklayer
includes free shipping to most countries on all of your purchases.
About the set
|
Theme
|
Fantastic Ideas
|
|
Set Name and Number
|
Rainbow Unicorn 70008
|
|
Piece Count
|
1492 pieces
|
|
Age Rating
|
14+
|
|
Printed Parts
|
Yes
|
|
Stickers
|
No
|
|
Minifigures
|
No
|
|
Light kit
|
Yes, Included
|
Where to get it and Special promotion
Pricing: $89.99 USD
>>>. JMB global online store:
https://www.jmbricklayer.com/product/rainbow-unicorn-70008/?wpam_id=33
15% off code: VIPLEGS15 (valid for all non-sale items within the store,
valid for a very long time)
Limited time only: Exclusively at JMBricklayer.com, orders actually
paid $69.99 or more will receive a free gift (includes US, UK, DE, and CA
warehouses).
>>> Amazon:
Now available on Amazon:
https://amzn.to/3C9wXWn (
15% discount code: JMBBZM15 (valid for one month))
The instructions
The detailed instruction manual describes the seven steps needed to build the
rainbow unicorn. The step-by-step instructions are clear and easy to
follow, making the set suitable for builders of all ages.
About the included light kit
The instruction manual gives very detailed instructions on how to add the
lighting kit to the set.
These are the lighting components, some will be added to the base structure and
other parts will be attached to the unicorn itself. While the USB plug is
provided, you need to provide your own power source, such as a USB battery pack
or wall charger. No power source is provided with this
set.
The build process
Here we have finished step 1 which is constructing the base. Of note is
the angular shape of the base and the various layers of plates to achieve this
interesting structure. Already we can see that there will be three technic
pin holes which will later be used to attach the unicorn to the base.
Step 2 reveals the intricacy and complexity of the added details to the
base. Some of the pieces are a bit finicky, so feel free to improvise to
make your own base unique. The introduction of the lighting kit is shown above
and there are many highlights that give off an Avatar-like feel. With
the base completed, we will now turn our attention to the unicorn.
For the step3, we will start to build parts of the unicorn body.
Step 3 reminds us that this is not a natural unicorn. The printed tiles
indicate that the unicorn might be mechanical in nature.
Hidden inside the unicorn body is the power plant that gives it life.
And here, after step 4, is the underlying L shaped structure of that will
transform into the unicorn.
Step 5 adds detailing to the unicorn head and the lighting features are attached
to give it a real mystical look. The head is loosely attached but is
strong enough in that it doesn't fall off.
More printed panel pieces are used to clad the neck of the unicorn.
In step 6, we have assembled the two hind legs of the unicorn. The bottom
of each hoove has a long technic pin which will be inserted into the base to
hold the unicorn in place. This technique was also used in the
JMBricklayer Mechanical dinosaur set which I reviewed
here .
During the build of the mechanical dinosaurs, one was required to handle the
large dino body while trying to connect the legs to the base. I found that
it was difficult to do, and upon seeing the same technique used in the unicorn
set, I decided to deviate from the instruction manual.
My alternate method is to attach the legs to the base first and then attach
the unicorn body to the legs later.
It's up to you how you want to build the unicorn, so do what is best for
you.
There is one leg that is lifted and that will not be attached to the base,
so this leg can be attached directly to the body.
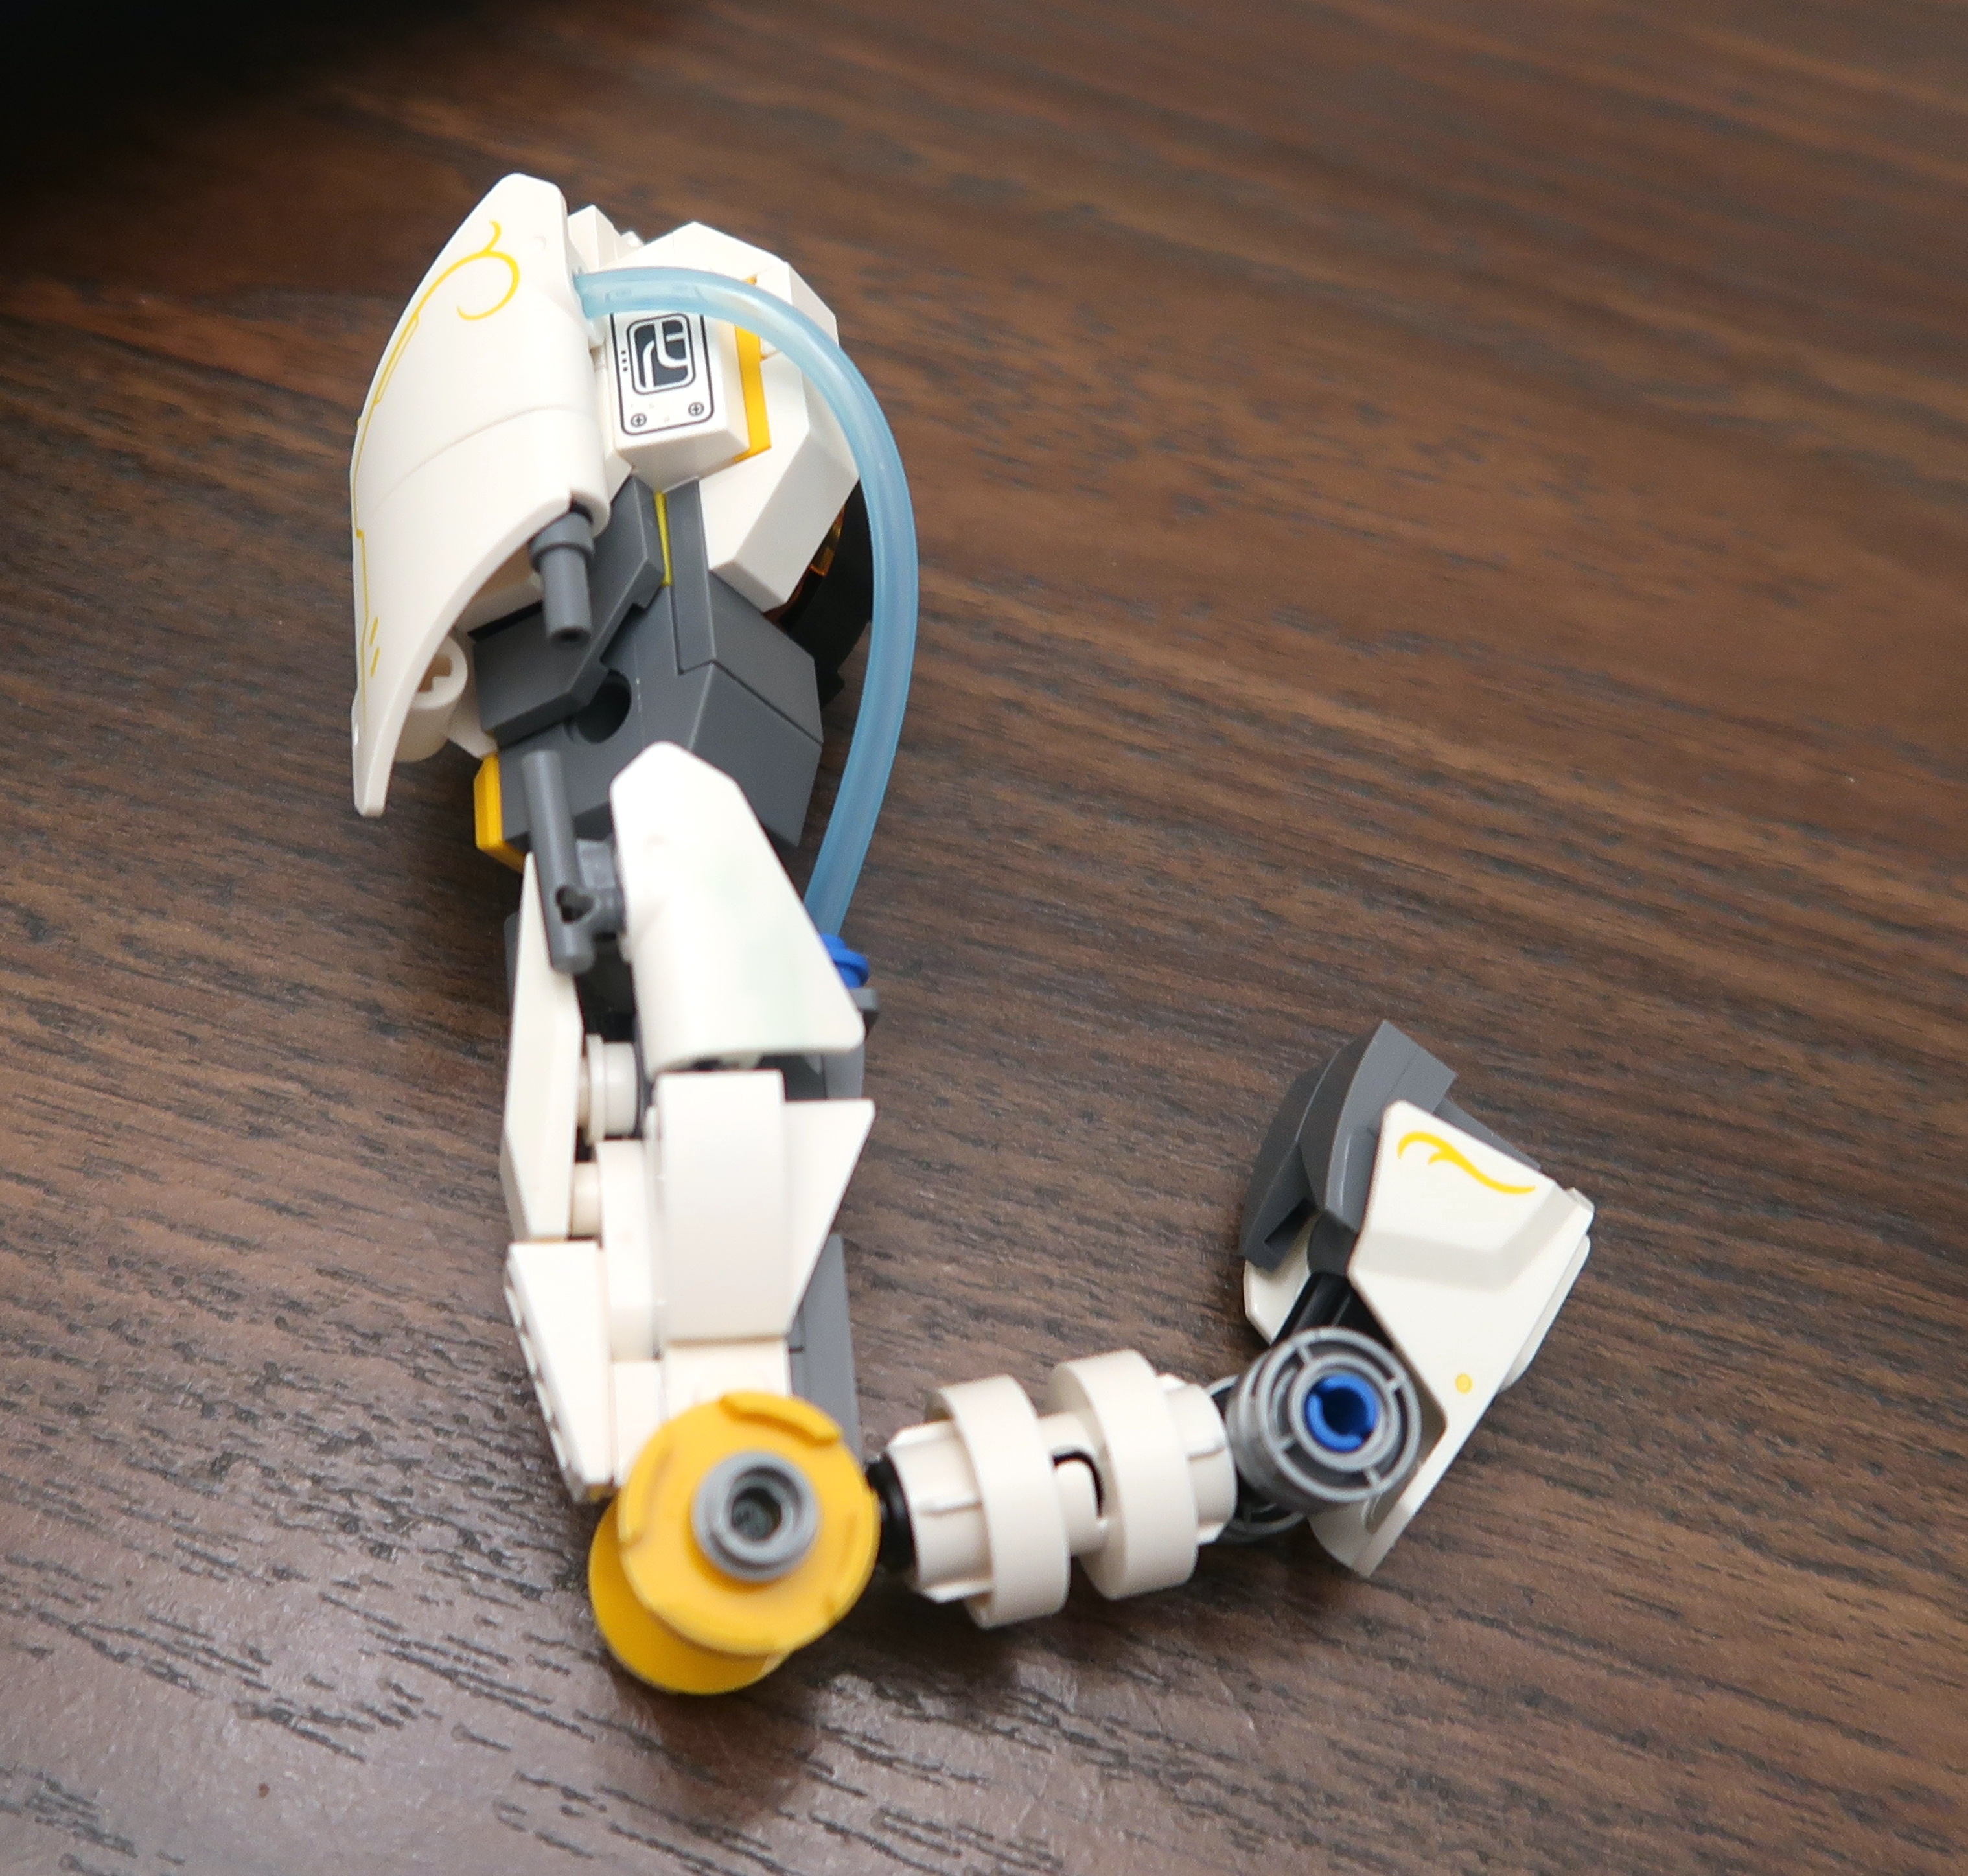
The Final Step 7
The front leg is the most problematic because the knee joint is weakly
connected and the weight of the unicorn's body is required to rest on this
single leg for support. I don't think the provided technic pin on the
front leg is long enough to secure the leg to the base because mine would
not fit into the base properly.
Eventually I was able to insert the front leg into the base and then attach
the body to the remaining three legs. However the front leg is
still a bit wobbly, so becareful when you are moving it.
There is special lighting for the eyes and the chest and the connecting
wires should run down the same leg to connect to the base where the
expansion port sits. This adds some complexity to the already
precarious front leg structure.
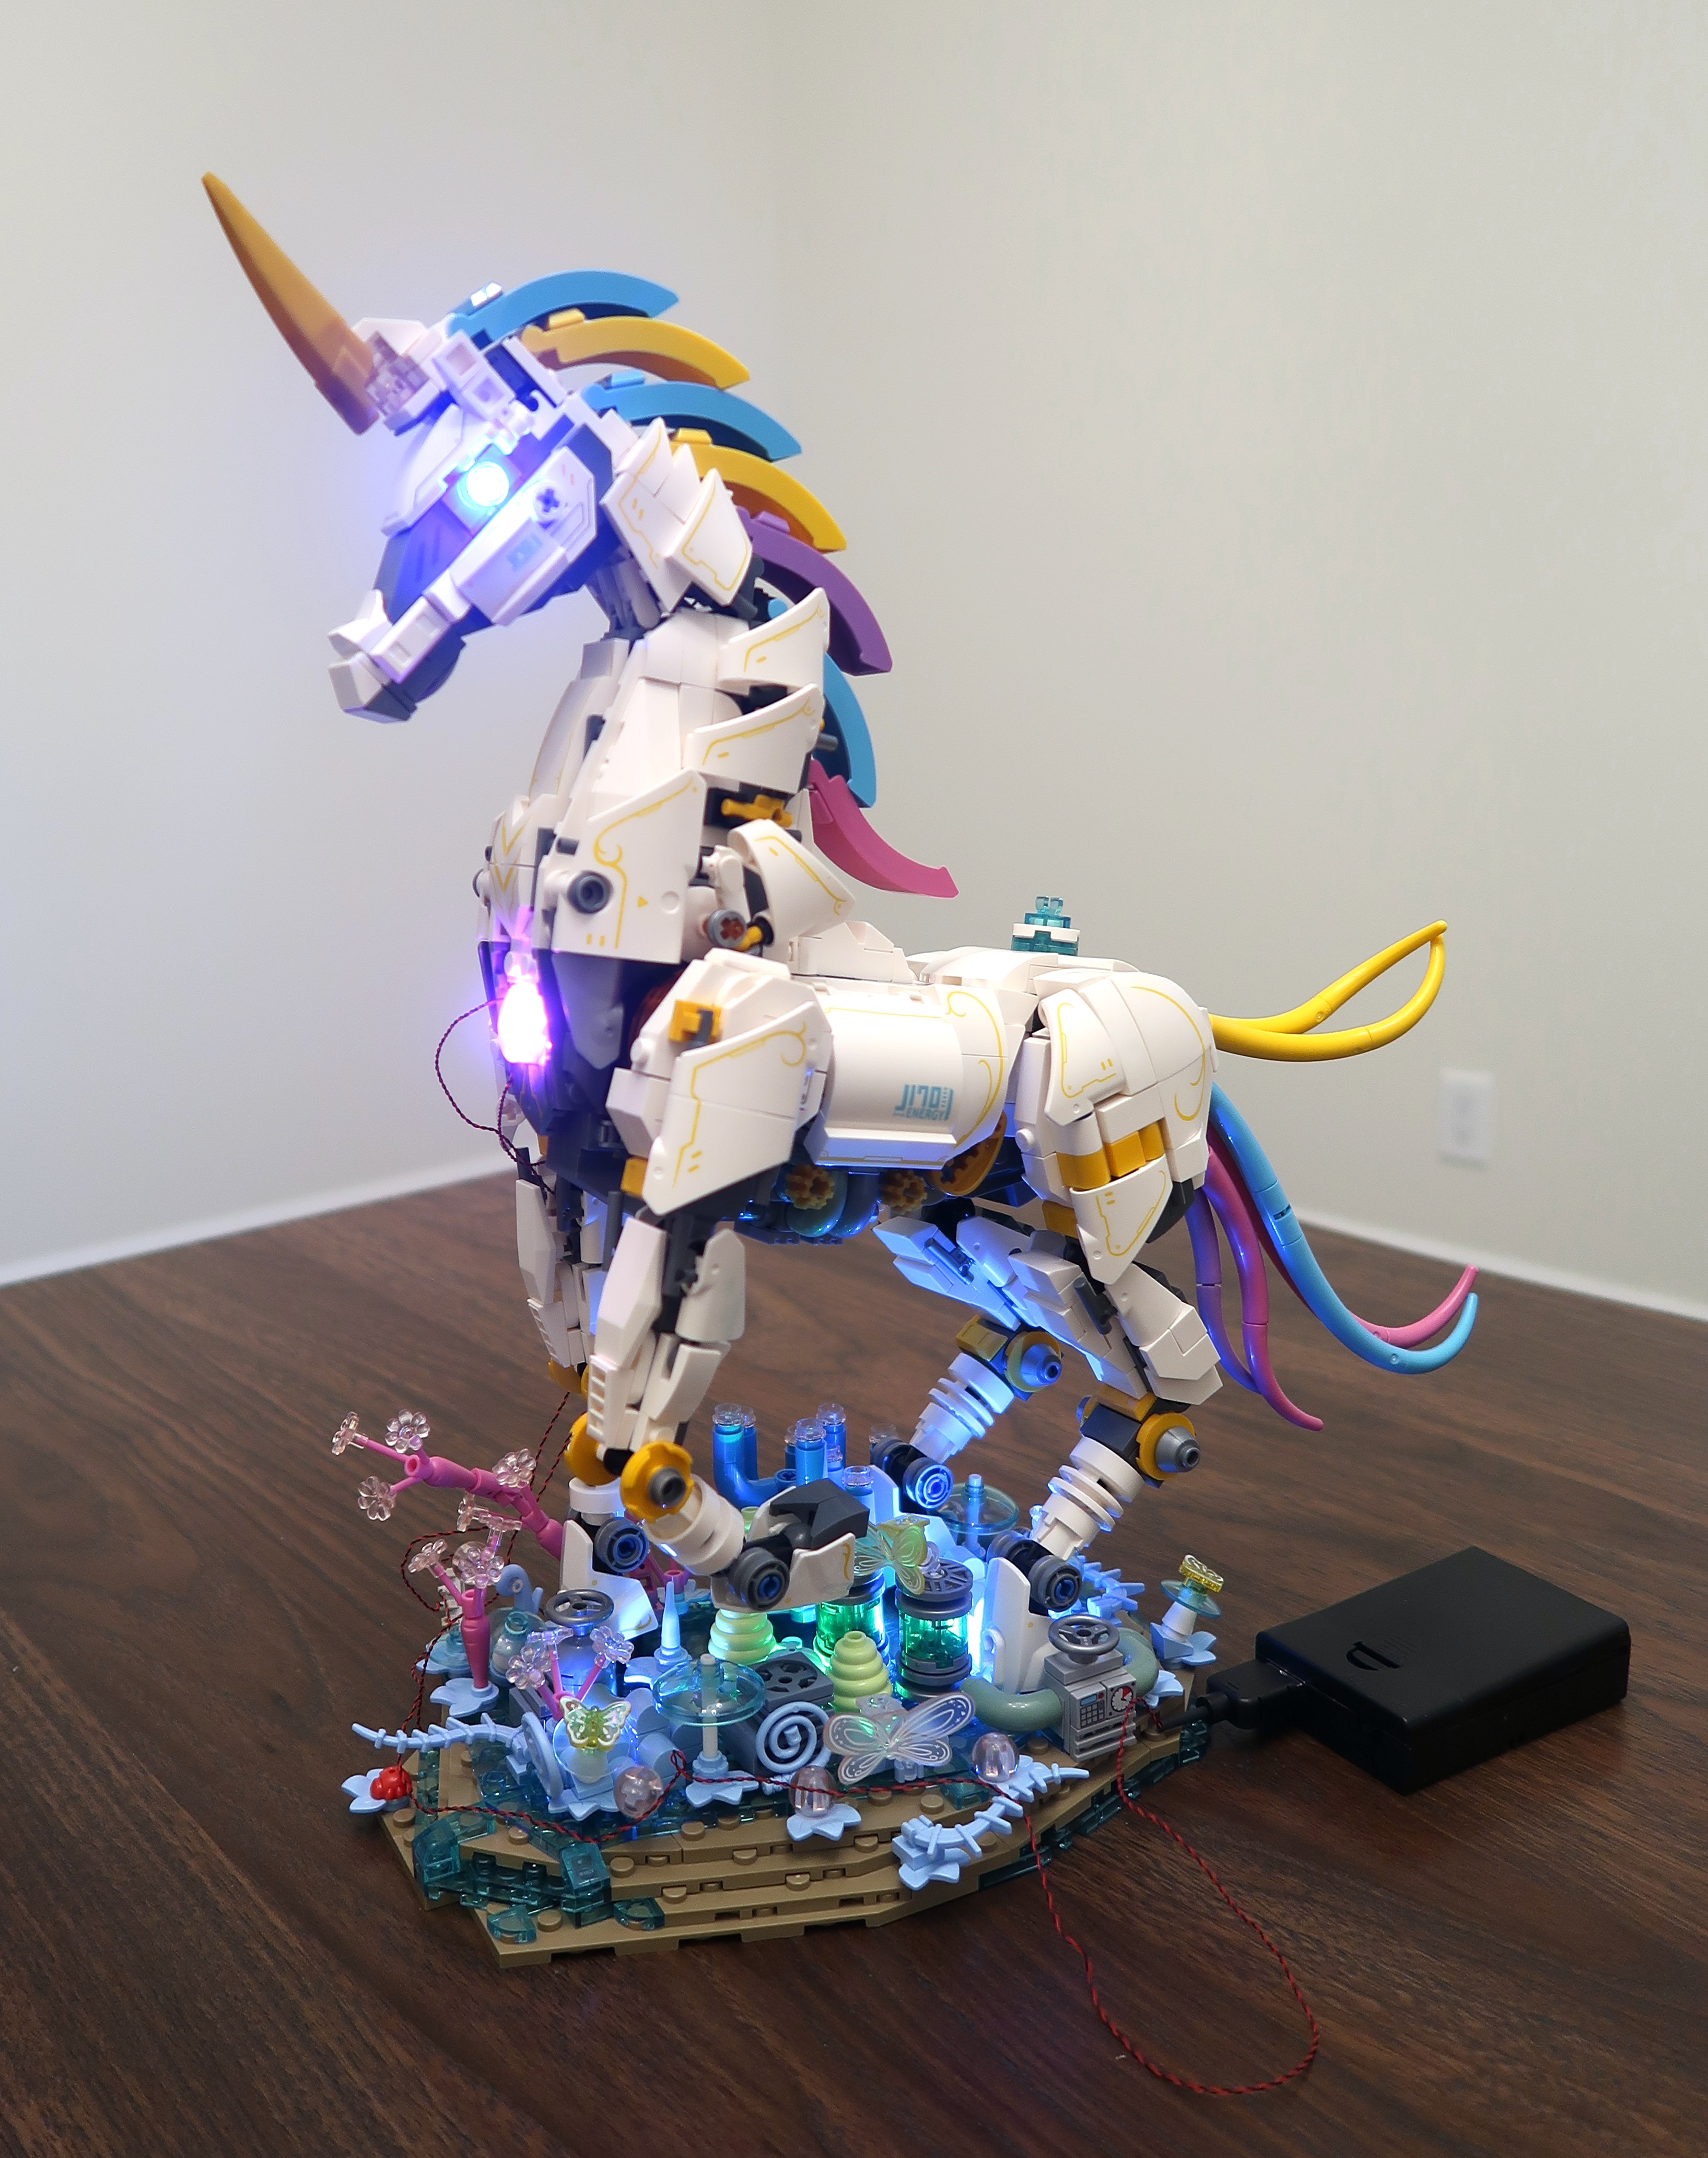
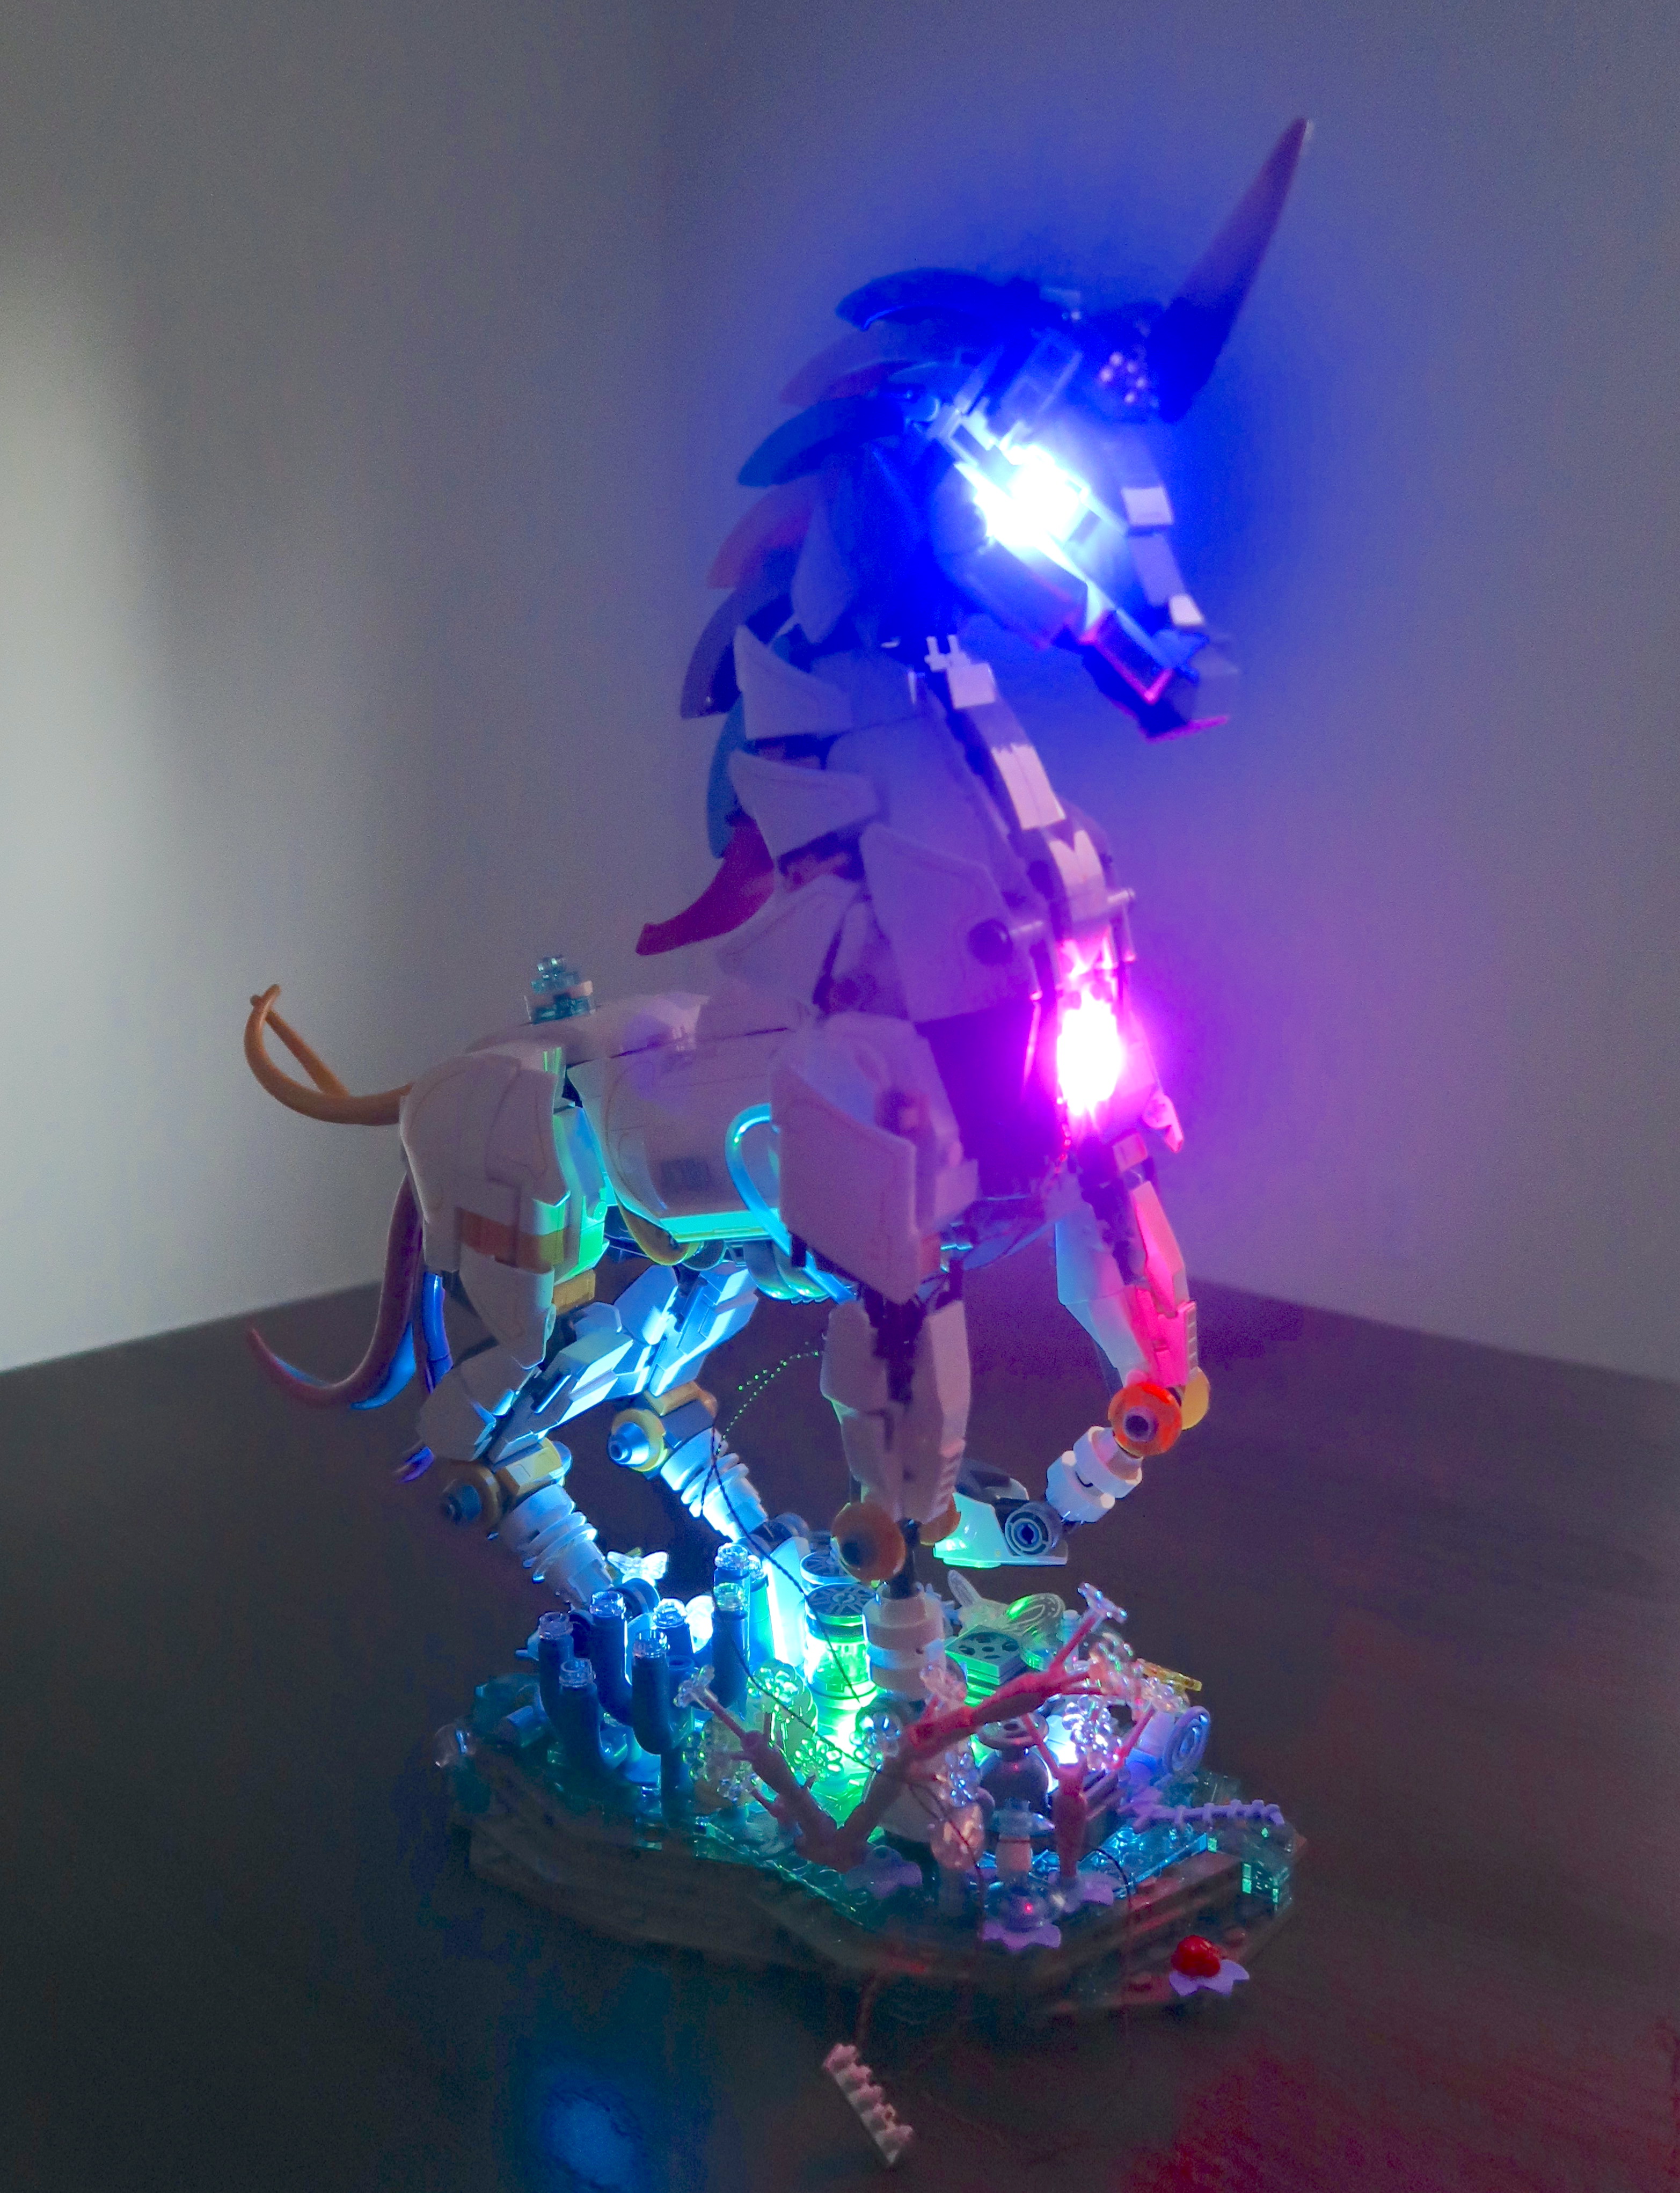
However, once you have successfully completed the challenge, the rainbow
unicorn looks stunning.


Final Thoughts
JMBricklayer’s unicorn building set brings together the charm of
mythical creatures and the fun of block-building. Its detailed design,
and bright colors make it a standout in any collection. This set
is definitely a display model because it is very delicate to the
handle.
I feel the main draw of this set is the lighting enhancements,
especially the uplighting from the base. The choice of the neon
colours on the base and as accent pieces contrast beautifully with the
white unicorn, making it almost glow! I'm happy to see that
JMBricklayer is incorporating more lighting features in their
sets. I especially enjoyed the
Vintage Model A set
that had the working headlights, tail lights and interior lighting.
My friend's daughter is already in love with this set, so I'm pretty
sure she will like to look at the wonderful lights in her room after I
give here the rainbow unicorn set.
https://www.jmbricklayer.com/product/rainbow-unicorn-70008/?wpam_id=33
Going forward, I would like to see JMBricklayer improve the support
structure for the front leg, either by redesigning the knee joint or
adding a support rod from base to the underside of the body.
This would improve strength and stability of this otherwise great
looking set.
For appearance, I'll give the set a 4.5 out of 5, but for stability
I'll give it a 3.8 out of 5.
Update as of Nov 7 from JMBricklayer:
"For the Rainbow Unicorn 70008, we've made some improvements and added
additional details to the instruction manual to enhance the building
experience. We hope these updates will make it even more enjoyable for
you and your audience!"
How To Attach Your Unicorn To The Base For A Stable Stand -
JMBricklayer Rainbow Unicorn 70008
https://www.youtube.com/watch?v=nrAih6OfK00
I love that JMBricklayer reads my reviews and provides solutions for
the issues I bring up. They continue to be a super responsive
company!
Thanks for visiting and bye for now!