JMBricklayer 70001 Mechanical Dinosaur Review
It's time for another building block set review! Welcome back to
bricktoyreviews.blogspot.com!
Hey, it's been awhile since I last posted so let's see what set we got
today. It's a mechanical robot dinosaur from
JMBricklayer. They have told me that the new Dinosaur set number is 70001 but when
I received it, the box and manual still was printed with the older set number
which was 70101. So when you see it in my pictures please don't be
confused. If you are ordering from the JMBricklayer website or
their Amazon store, look for set 70001.
Today's building block set has again been provided by JMBricklayer.
Let's now review the particulars of this set before we unbox and build it.
Brand:
JMBricklayer
Set:
70001 Enhanced Mechanical Dinosaur (not 70101).
Theme:
Fantastic Idea/Animal
Number of pieces: 1470+
Recommended Age: 14+
Printed Parts or Stickers? Both
Minifigures included: No
Numbered bags: Yes
Missing or extra parts: Extra
Assembled Dimensions: approx 22.5 inches long x 9.5 inches high x 7
inches wide
Promos at time of writing:
Yes: click here for details!.
Unboxing
As with all other JMBricklayer sets, this one came in it's original
box. Box size is approx 14 inches long by 9 inches high and 5 inches
deep.
Looking inside the box, we get an instruction booklet, a small sticker and
several numbered bags.
The instructions in the manual are easy to follow and provide some pictures of
the completed dinosaur set. There's also a sticker for affixing to the
plaque on the front of the set.

There are 6 sections in the manual and the parts bags have corresponding
labelled bags. within each step there are another 4 or 5 bags of
parts. So about a total of 30 bags of parts more or less.
About the set
So this 1470 piece building block set is a model of a half dinosaur and half
mechanical robot. When viewed from one side it will resemble a natural
dinosaur and on the other side you will see that it is a complex creation
composed of gears and metallic mechanisms. To build this set,
there are six major steps.
- the base display
- the dinosaur appendages
- the mechanical robot appendages
- the body
- the head
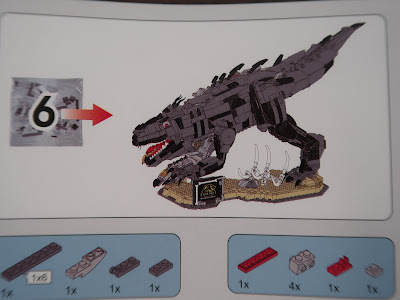
- the tail and final assembly
I've taken some pictures of each step of the build so let's take a look.
Step 1 - Build the Display
Step 2 - Build Dinosaur Appendages
Step 3 - Build Mechanical Appendages
Step 4 - Build the Body
Step 5 - Clad the Body and Build the Head
Step 6 - Build the Tail and Final Assembly
From Steps 1 through 5, the building was very smooth and easy to follow.
At Step 6, however, when it came to final assembly, I expected it to be a
breeze but it was not. The head and mechanical legs attached to the body
with little effort, yet when I tried to attach the hind supporting leg to the
body, I found that there were some tolerance and clutch issues.
And the dinosaur leg would not stay attached. This was unexpected. But why?
I can only surmise that there were some same issues with the original
JMBricklayer 70101 mechanical dinosaur which this new enhanced 70001 is
supposed to replace. My expectation would be that the newest version
incorporated all of the structural changes found in set 70107 (the brown
dinosaur shown above).
But when I reviewed and compared the steps between the two sets 70107 vs
70001, I feel that there could still be improvements made to the new
set. For example here is the attachment instructions for both dinosaur
building sets.
The brown dinosaur 70107 has three attachment points for the hind leg.
Solid connection.
The newer enhanced 70001 only has one attachment point. The brick pieces
used in both are not the same and I feel the newer set should have used the
method as found in set 70107. This is a critical connection because
the weight of the entire dinosaur rests on this one connection
point.
The people at JMBricklayer were very quick to provide some additional
information about how to properly attach the hind legs, but suffice to say I
could not make mine work. I have seen pictures of other people who
have built the newer set without issue, so perhaps I assembled mine
incorrectly. Although I still wonder why the same build technique used
in set 70107 wasn't just duplicated for this new 70001 set?
I tried to incorporate the fixes as per the guidance above but could not get the
knee and ankle joint to line up properly without the upper thigh popping off the
body.
The only way I could support the weight of my dinosaur was to strip away some
of the brick pieces from the dinosaur belly and place some transparent parts
to hold it up.
As you can see the dinosaurs do make a great display especially posed side by
side. I would recommend the JMBricklayer mechanical dinosaur 70001 set to
adult fans of the brick and particularly those who want a challenging
build. And if you are a fan of mecha or dinosaurs this is a must have in
your building block collection.
As of right now you can take advantage of special pricing for this set by
going to JMBricklayer's website or Amazon pages.
Please use my code "itsnotlego15%" to save on your purchases at the JMBricklayer website (non sale items).
Have you built either of these sets? Please let me know in the
comments how it went and which was your favorite! Thanks for
looking Bye!


