Hi brick fans, welcome back to bricktoyreviews.blogspot.com!
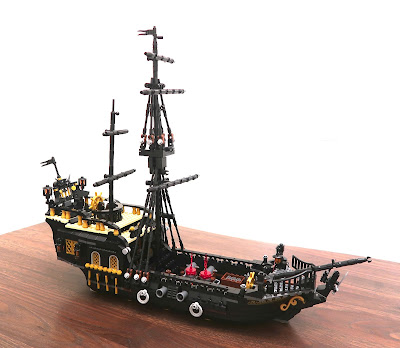
Today we will be building a very iconic Pirate Ship known as the Black
Pearl. I'm sure many of you are familiar with the movie Pirates of the
Caribbean in which the pirate ship and her captain Jack Sparrow have many
adventures on the high seas.
Here's the story of the mythical Black Pearl:
https://en.wikipedia.org/wiki/Black_Pearl
The pirate ship is so popular that there have been many brick brands that have
their own version of the Black Pearl. MegaBlocks had three small sets
featuring the Black Pearl as far back as 2007.
Lego came out with their set 4184 back in 2011 which was subsequently copied
by Lepin, Lele, King, and Sheng Yuan.
Other brands that made a Black Pearl pirate ship set include: Reobrix,
MouldKing, Jiestar, DK, Gudi, Kazi, and Forange.
Now, JMBricklayer has their new version of the famous Black Pearl and they have
sent me a set to review!
JMBricklayer is a popular brand that has been around for a number of years
and specializes in selling Lego-compatible building block sets for ages 14
and up. Check out all of their sets
here.


There are a total of 28 bags of parts, comprised of two unmarked
bags containing parts of the hull, rigging and sails, as well as
numbered bags labelled 1 through 5.
A special feature of this set is the lighting kit that is included
with the set. It features a AA battery pack (3 AA batteries
are required but not included), and various lighting elements that
attach to a multi-port board with USB plug.
The set includes a paper instruction booklet with clear and easy to
follow instructions.
There are 5 steps to building the JMBricklayer version of the Black
Pearl which we will look at now.
Building the Black Pearl
Before you start building, one of the first things to do is to test
that all of the lighting components are working properly. The
lights should already be attached to the board as well as the USB
plug. Place batteries into the battery box and insert the USB
plug. All the lights should come on when you switch on the
battery box.
Step 1: Build the Ship's Hull
Here's a quick look at the Lego compatible brick pieces that are
used in the set. All very good quality parts with no scratches
or scuffs. A brick separator tool is also included.
Here's the bow construction with the first of many lights to install.
The interior of the pirate ship is nicely detailed with 4 cannons, a
crate of ammunition, a treasure chest and a barrel of
cutlasses. In addition to the two bow lights, there are
two large red flames that light up in the centre of the ship.
Step 2: Constructing the Rear Deck
Here's the interior of the Captain's quarters. There's a
parrot, and a mysterious blue bulb flanking a large desk and
chair. A printed map is laid out on the table.
A different angle.
So this was really weird. I found a brown fedora hat as one of the
accessories, but it looks so out of place in this pirate set.
It should be in an indiana jones style set instead.
I had some brick clutch issue in that the large gray floor plate
had a hard time staying in place. It took a bit of nudging
but finally got it into place.
Step two is complete!
Step 3: Building the Captain's Cabin
Attaching the cabin walls.
Attaching the 4 lanterns. There's an additional printed tile
adorning one of the walls.
The aft wall can fold down to reveal the interior.
Except that the brick clutch is lacking and the wall tends to fall
off.
I used my own two 2x4 plates to provide some extra support so that
the back wall would not fall off.
Here's the top deck installed.
The Black Pearl is ready for masts and sails!
Step 4: Centre and Aft Mast
This step is fairly straightforward and easy.
Step 5: Finishing it Off
Here's the final Mast assembly.
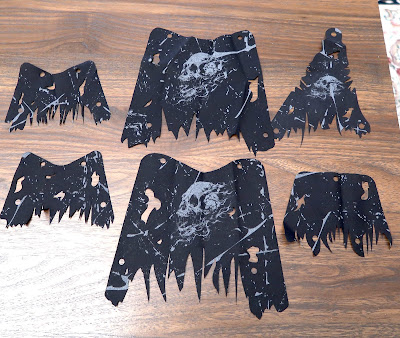
A look at the sails before we attach them. The printing of the
skulls are a bit faded. I think they would look better if the prints
were whiter just like what is depicted on the box.
I chose not to add any of the rigging, because A) I hate tying
strings and B) it makes it harder to disassemble or clean the set
later.
Wow, the Black Pearl looks pretty amazing! I couldn't resist
adding some pirate minifigures to the ship. You can see that
it's a good size and even with several minifigures on it, it doesn't
feel overly cramped.
Unbeknownst to Captain Jack Sparrow, the crew is about to mutiny!

Oh look, there's the
Flying Dutchman Ghost Ship! In terms of size, the JMBricklayer Flying Dutchman Ghost ship
is a lot smaller in size. I posted a detailed review for it
which you can find
here.
However, the lights on the Ghost ship are way brighter than the ones
used on the Black Pearl.
Final Thoughts
Here are some Pros and Cons of the set:
Cons
I encountered a number of brick clutch issues, such as the aforementioned
rear deck plate not gripping and the aft wall of the captain's cabin
falling off. I also had problems with the bow lights whose bricks
were too loose.
It's not easy to appreciate the little details of the captain's cabin,
even if you open the back wall.
Also I pointed out that the ghost prints on the sails were not as bright
as the ones pictured on the box.
And the lights used were not was bright as the ones that came with the
Flying Dutchman set.
Lastly, it would be nice to include a few minifigures with the set to
increase play value.
Pros
I liked the design and size of the ship. It had ample room for me to place
some minifigures into it. The light kit was easy to install,
and I liked the fact that no stickers were used, only printed pieces.
Overall, the
JMBricklayer Black Pearl Pirate ship
represents good value for the piece count and for the included lighting
kit. It's a perfect set for any fans of the Pirates of the Caribbean
movies
I recommend this set with a rating of 4.3 out of 5. Let me know what
you think in the comments below!
Thanks for looking bye!


