JMBricklayer 70002 Puppet Show Review
Hey brick fans! We are back with another cool building block set review. Today's set is the new for 2023 Fantastic Idea Puppet Show with approx 1900 pieces and it was kindly provided by JMBricklayer for this review.
Here's the direct product link on the JMBricklayer website. See below for the special promo pricing!
Ok, let's get into it!
Unboxing
The Puppet Show building set came in a rather large box. On the box, the
appearance of both the JMBricklayer and the Wekki brand logos look like they
are cooperating on this set.
The box is packed to the brim with parts bags, so we will take a look at
what's inside. We've got the mandatory instruction booklet, a
crumpled sticker sheet and something new.
The bonus item is a cardboard sleeve that comes with two finger socks, a
discount coupon and a product booklet showing a huge assortment of the
JMBricklayer block sets.
There are several bags of parts of which I counted a total of 11 bags.
Some have numbering from 1 thru 5 and you'd be correct in assuming that
they correspond to the building stages in the manual. One of the bags
contains preformed parts for the face, hands and cap and another bag contains
a LED light brick.
The instruction manual looks to be clear and concise and is broken down into 5
stages of construction.
1. The display base and part of the treasure chest
2. The treasure chest and accessories
3. The puppet's torso
4. The puppet's appendages and head
5. The puppet's hair and features and optional control stick
1. Building the display
Here we have all of the parts bags for step 1.
Along with the other parts I found some printed pieces and a brick separator.
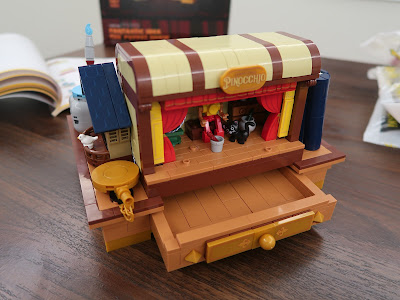
After you have built the display, there will also be a drawer that slides in
and out. Not sure what it's used for, but nice to have this special feature.
As you can tell, there are already a lot of cool details and we've only just
finished step 1.
2. Finish the treasure chest and add some accessories
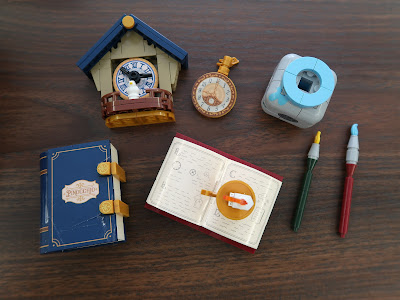
We're not done yet! Here we've assembled some of the accessories that
will adorn the front of the display. Many will have stickers which I
will attach a bit later. There's a open book with a candle, a blue bound
pinocchio book, some paint brushes and jar.
I forgot to mention that I also finished the lid of the chest in this step,
comes with a very realistic looking lock. This is where the completed
puppet boy will sit.
Adding the stickers makes the accessories much more realistic I think.
My pinocchio book cover sticker got a bit damaged during transit, but still
looks usable.
The torso came together easily and you can see a lot of the printed pieces that were used for the pants and suspender details. I didn't realize it at the time when I took these pics but I had the knee joints backwards, oops.
4. Build the appendages and head block
Pinocchio's feet, the laces are printed.
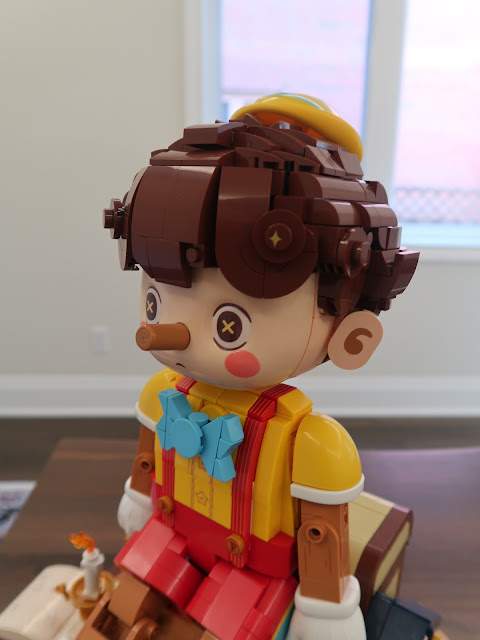
One of the un-numbered bags contained all of the molded parts for the face,
hat, hands and shoulders. And the nose, I forgot about the nose
(actually, noses!)
Puppet boy's arms and legs have been attached. Now it's just a matter of assembling the head and mounting it to the body.
Pinocchio is almost there!
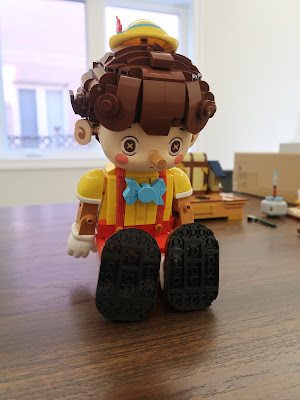
It's ok for me to lay him down, but standing is definitely a problem, as his
knee and waist joints move too freely.
Gallery
The set dimensions of the Pinocchio Puppet Show set are as follows:
approx 12.5 inches high, 8.25 inches wide and 6.25 inches deep.
Once attached to the chest, Pinocchio is on pretty good. I moved him to my display shelf and the building set held together well. As I mentioned earlier, you can display the puppet boy with either a longer nose or a short nose. Here he is with the short nose.
Final thoughts
I built the
JMBricklayer 70002 Puppet Show
over the course of about a week off and on. Everything was smooth
sailing until trying to attach the heavy head to the body.
There was a few occasions where the head did not want to stay on the
body, mostly because of the weight.
I don't think it's so much of a clutch issue than a design issue from my
perspective. I believe that there should have been a perpendicular
technic pin used to secure the square block at right angles to the
head pin to brace it. The best location would be between the two
upright turquoise blocks. By doing this there is less chance
that the head will want to shear off the body.
This was also another reason why I chose not to put the puppet on the
control arms because I think, inevitably the head would have come off
during puppet movement.
Ok, other than that minor nit, I think that Pinocchio, the puppet boy
displays really well. I really like all of the small and big
accessories that come with the set. The stage built into the base of
the treasure chest is a novel idea.
Brick quality and clutch is decent and the finish of the bricks used
reminded me of the quality of the bricks used in the JMBricklayer 30001
Remarkable Ancient Machine building block set. You can find my
review for that set
here, btw.
The set came with a variety of both printed pieces and stickers, but the
stickers were pretty good despite being a bit crumpled. While the
free finger socks were a nice touch, I'm not sure that I will have much
use for them.
Other than the constructed puppet inside the stage, there are no other
minifigures included with the set.
Thanks once again to JMBricklayer for giving me the opportunity to do an
early review of the
Pinocchio Puppet Boy
set.
Here are the special discounts effective right now!
For US Amazon, the website link https://www.amazon.com/dp/B0CB434FPM,
the coupon code XHNARY15 for US Amazon applies only to the
non-discounted Puppet Show 70002 and is valid for one month, offering
a 15% discount.
In addition, as for the online store,the website link
https://www.jmbricklayer.com/product/the-puppet-show-70002/, the
coupon code VIPLEGS15 applies to all non-discounted products and
offers a 15% discount. The code is valid until December 31,
2023.
Please use my code "itsnotlego15%" to save on your purchases at the JMBricklayer website (non sale items). Thanks for visiting and see you in my next review! Bye!


