LesDiy.de MOC58912 Medieval Dutch Windmill Review
Hey guys! What's up and hope you are all doing well. Sorry I
haven't posted recently, have been busy with some MOCs that I hope to show you
soon.
Speaking of MOCs, today we are going to look at a cool looking medieval themed
set, the
Dutch Windmill Building Block set, from
LesDiy.com. The set number is Mocsage MOC-58912.
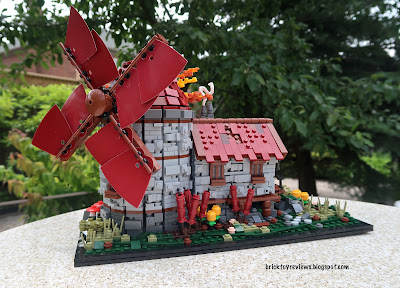
The stunning windmill set is a MOC designed by PeetersKevin. It has 2296
pieces. The windmill consists of a round masonry tower mill with a small
cottage attached to it. It sits in a small rectangular plot that is
covered with natural vegetation and a large colourful tree. I think it
has a very rustic look and the colour scheme with the predominately dark red
roof and windmill looks nicely contrasted to the unique grey brick walls.
Apparently the designer Peeters Kevin wanted to use some mini figure capes he
had, and thought that they would make good windmill vanes. The round
masonry tower is definitely eye-catching, so I hope my pictures of the set
do it justice.
As always, I'll show you the contents of the building block set, put it
together and provide my honest opinions about the set.
Today's blog post is brought to you by our newest partner LesDiy.com.
They are a leader in providing very unique and specially authorised MOC sets
just like this Medieval Dutch Windmill. Thanks so much to
LesDiy.com
for providing this awesome set for today's review!
You can find this set and many more on the
LesDiy.com website.
Special notice: If you are ordering anything from the website
LesDiy.de, you can use my
special code
itsnotlego20 to save an
extra 20% off (does not apply to LesDiy.com at the moment, sorry!).
The Unboxing
The Medieval Dutch Windmill that LesDiy.com sent me came in this colourful
box.
Even the back of the colourful box shows you all the features of this rustic
windmill.
Boxes within boxes! I found two boxes labelled A and B inside.
Inside box A, I found the instruction manual, 3 large bags numbered 1, 2 and 3
and a small bag of dark red capes. There looks to be several more bags of
parts inside the large numbered bags.
Here's the contents of box B, numbered bags from 4 thru 7 with plenty more
smaller bags inside those.
When I opened the instruction manual I found this small sticker sheet (shown
with the capes for scale). They look to be stickers for the little cottage, is
my guess.
The instruction book has over a hundred pages, but the paper quality isn't as
good as some of the manuals from other building block sets, however my first
impression is that there are a lot of helpful tips throughout the manual as
seen above and below. The manual is divided up into sections that
corresponds to the numbers found on the parts bags. So there will be
seven steps used in the construction of the windmill.
Something that you don't find in too many non Lego building block sets is a
parts inventory page, but this set has it.
Step 1
Here's the contents of big bag #1. There are five smaller parts bags,
some baseplates and a brick separator tool. It's thoughtful of
them to package the tool right in bag 1, so you can use it right away if
required.
These are all of the parts liberated from the bags that will be
used in step 1. Let's go!
And here's what we've built from all the pieces in step 1. We've got the
base with some foundational bricks and some landscaping. So far, so
good, on to step 2.
Step 2.
Another five small bags for step 2.
Here are all the parts for step 2.
In step 2, we start building the round tower with the stone walls.
You have to pay special attention because they are a lot of staggered
offset placements of bricks. I ended up having to improvise
because you need to make sure that the wall levels are even at some
point.
Step 3.
Moving on to step 3 we find another 5 bags of parts. Looks like we
will be building the remainder of the stone tower in this step.
Just want to say that lots of the parts are composed of 1x1 and 1x2 pieces
and SNOT (studs not on top) bricks.
In step3, we have continued building the tower mill and have also
started building the small house/cottage.
Step 4.
Looks like there's some consistency because in each larger bag there are
another 5 small bags of parts. As the case in step 4.
Here all all the contents of all the parts for step 4.
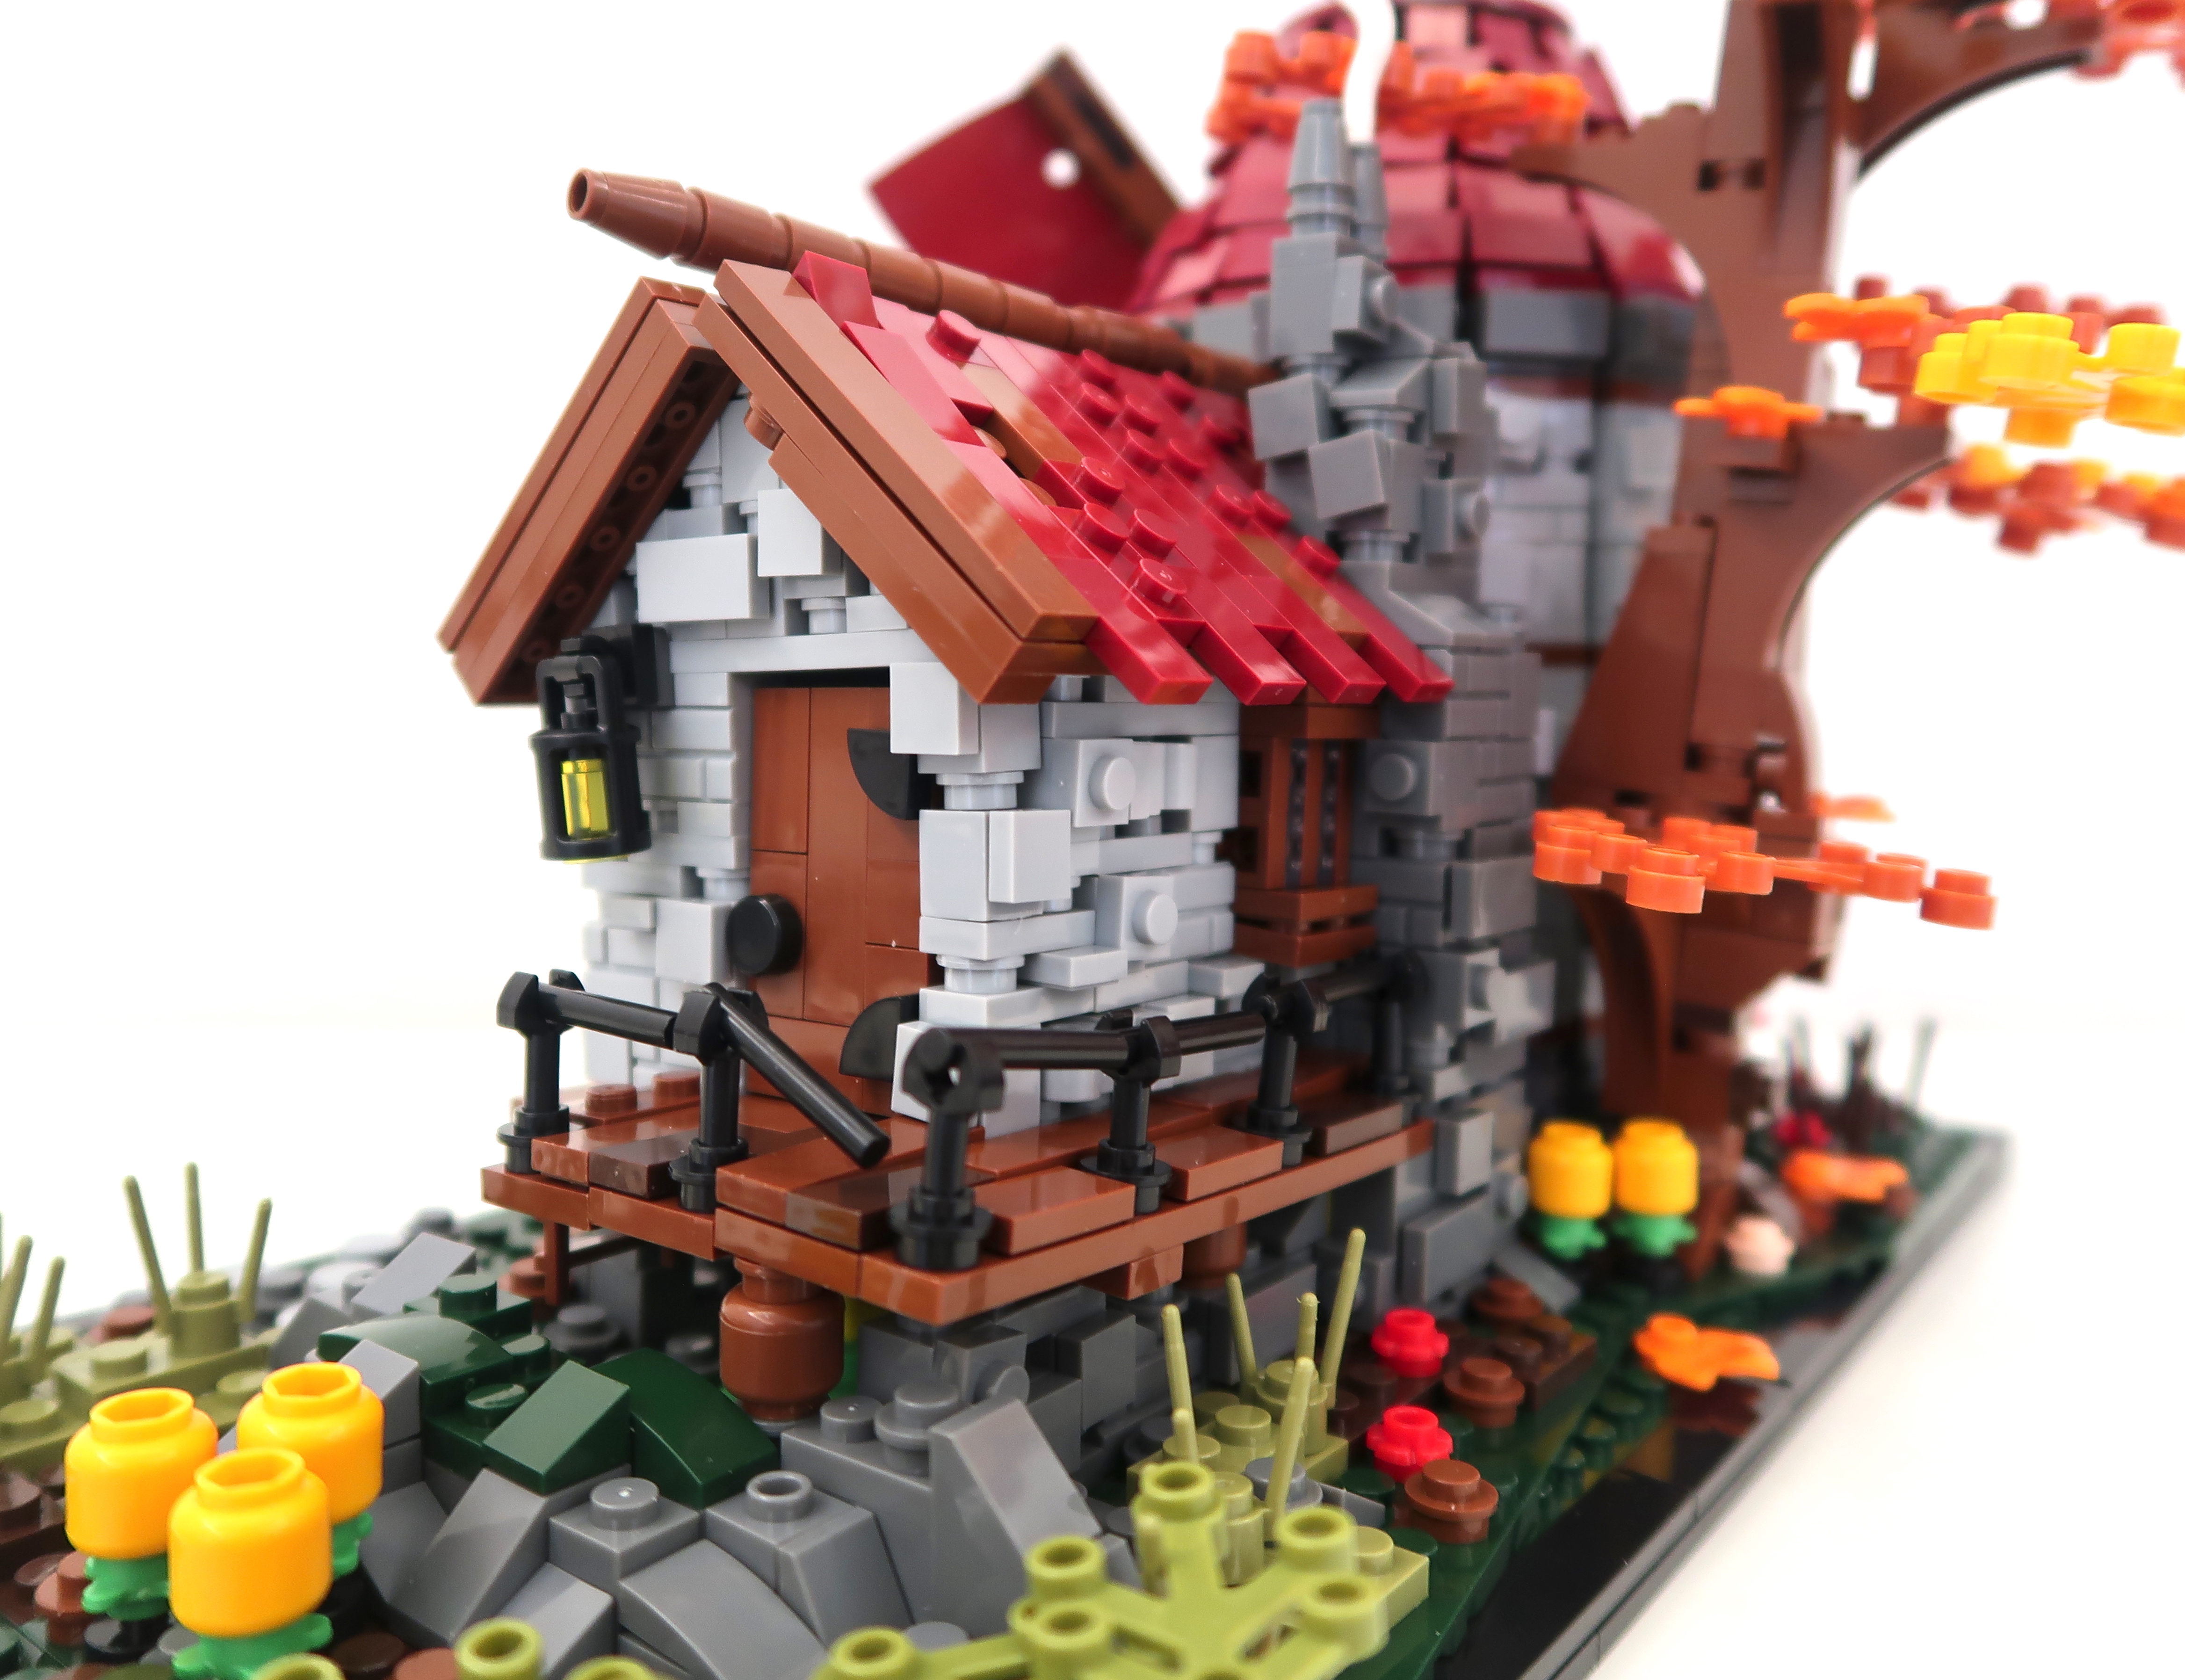
Upon completion of step 4, I suddenly realize that the cottage is really
really small. The interior is unfinished. Hmm, should I call it a
shed instead of a house?
Step 5.
Cracking open big bag 5, we find, yup, another 5 bags of parts.
Here are the parts to begin step 5.
Finally, we see the windmill and shed, I mean, house starting to take
shape! In this step, we have finished the cottage, added the roof
and put it on it's foundation. Some extra landscaping has been added
as well. Check out the smoke coming out from the chimney. It's
actually made from a snake part, how cool.
The cabin has a non functioning door with a lamp next to it. The
porch and railing are pretty rickety, sorry my bad on the construction of
it.
Step 6.
Step 6 and it's 5 bags.
Hmm, a flesh coloured wagon wheel inside of all the pieces for step 6.
So all of the windmill roof tiles are clipped to three wagon wheels that
are pinned to the center shaft. Very ingenious, but tricky to get
each level lined up properly. The masonry stone wall tower is
very sturdy but the roof is more delicate to the touch.
A different view of the windmill. The windmill sails or vanes will
be attached to the technic pin protruding out from the roof.
Step 7.
What? In step 7, we only get 4 bags of parts, not 5! Anyone keeping
track of how many parts bags we have altogether? I count 34 parts
bags, not counting the big bags.
Looks like we will top off the windmill roof and make a nice looking
tree in step 7.
Oh and almost forgot the windmill vanes. So I thought that these
capes would be made out of fabric, but they are just cape-shaped pieces of
cardboard. Might be a deviation from the original design.

Check out those neon mushrooms! PSA, don't eat anything that
glows, it's probably toxic.
Must be fall colour season! Since this set doesn't come with any
mini figures, I added my own so you can get a sense of scale. What
do you think of the size of this model?
If we had a drone, this is how the dutch windmill would look from
above.

Sorry, still nothing to see here folks. Also, the inside of the
stone tower is just bracing so there's no interior there either.
Final Thoughts
So I built this 2296 piece set over the course of two days,
probably a total of 12 hours of effort.
Here's a handful of parts that were leftover, some of the brown
bits were supposed to be put on the tree, but I kind of
free-styled it so I didn't use all the parts.
Another part of the set I had to improvise was during the
building of the tower masonry walls. It was very detailed
and tricky to put together because of all the 1x1 bits, but once
the walls were secured, it was rock solid. The base
on which the windmill sits is solid too, so no worries about
moving the set around.
Overall, I love the look of the windmill, because it's quite a
unique build. I wish the building was a tad larger but I
understand why the designer chose the scale, so that it would
work with the capes as vanes.
On the plus side, because of the smaller footprint, the windmill
will not take up too much space on your shelf or desk.
It's primarily a display piece and not a play set due to the
lack of interiors and minifigures.
Here's the Dutch Windmill set pictured with another one of my
Medieval themed buildings. Do you think they look ok,
displayed next to each other?
Although the set came with a sticker sheet, I didn't feel the
need to use them. Brick quality and clutch were decent,
which was fortunate due to the high number of small parts.
My biggest gripe is how the colours in the manual were
depicted. It was really hard to differentiate the
red brown parts from the dark brown parts. The dark red
parts were displayed as brown. And the orange branches on
the tree were shown to be dark brown in the manual.
Definitely the colour renditions could be improved.
My rating for this set is a solid 3.8. out of 5. I
definitely agree with the age rating of 14+ for this set.
If you made it all the way here to the end of my blog post,
thanks so much!!! As a bonus, here's a few more
pics for your viewing pleasure, before you go.
Click
here for more LesDiy reviews!
Thanks so much for taking the time out of your busy day to
read my post. Have a wonderful day and see you
in my next post!